In this tutorial I'm going to explain you how to create a nice header with brush effect. I tried to give you as many images as possible. If you have any further questions you can always ask them by leavig a comment.
First of all open photoshop and create a new document like below:
Fill the background color with #666666 and get the Rectangular Marquee Tool (M) and select about 800 x 15 px on the top of a new layer(Ctrl + Shft + N). Fill this layer with anycolor you want. Now open the blending options and add these styles.
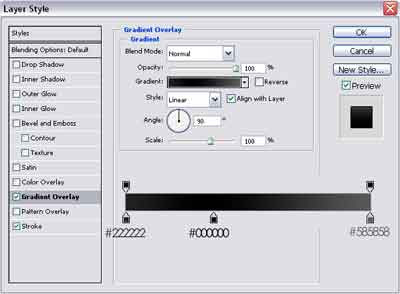
Apply a gradient overlay from #222222 to #000000 and end with #585858
And add a black stroke line from 1px.
Next we get the Rectangular Marquee Tool (M) again and select an area from about 800 x 150 px just under the bar we created, this is for the header so pick what fits the best for you, create a new layer (Ctrl + Shft + N) and fill this layer with any color you want. And apply a gradient overlay like below.
And add a 1px Black stroke like on the image below.
Now select Layer 2 (The header layer) and Ctrl + Click it to select it or go to Select > Load Selection and hit OK. Next create a new layer (Ctrl + Shft + N) above the previous created layer, this would be layer 3, on this layer we are going to create the grass effect. Do not deselect! Take out your brush tool (B) and get the Dune Grass and the Grass brush (If you reset your brushes they should appear in the list). Now brush the bottom of your header until you get a effect like me.
Next create a new layer (Ctrl + Shft + N) and again select the header layer (like above) Select > Load Selection and hit OK or just Ctrl + Click and apply a gradient from #FFFFFF to transparent going to the right bottom corner. Now add some text and your header is ready. I added some brushes and some blending options on the text, feel free to do it as wel. This is my final outcome.
Create a nice header with brush tool tutorial
Labels: Photoshop Tutorials
Search
Categories
- $ Cheap Price (2)
- $$ Price (3)
- $$$ Price (1)
- 2 Colum (1)
- 2 columns (2)
- 2008 (1)
- 3 columns (7)
- About CSS3 (8)
- Advance CSS3 (66)
- affiliate (1)
- ajax (11)
- ajax tutorial (4)
- asp tutorials (1)
- asp.NET (1)
- Avatars (2)
- blog action day (1)
- blog contest (4)
- blogger (5)
- blogger templates (2)
- blogging (3)
- button (1)
- color (1)
- color schemes (8)
- comment (1)
- css (3)
- css articles (6)
- CSS Aural (19)
- CSS Borders (19)
- CSS Classification (5)
- CSS Color and Backgrounds (11)
- CSS Dimensions (7)
- CSS Dynamic Content (5)
- CSS Font (8)
- CSS Generated Content (5)
- CSS International (19)
- CSS Lists (6)
- CSS Margins (5)
- CSS Outline (3)
- CSS Padding (5)
- CSS Positioning (11)
- CSS Printing (9)
- CSS Scrollbars (8)
- CSS Shortcuts (5)
- CSS Tables (6)
- CSS Text (13)
- css tips (26)
- css tools (10)
- CSS Tutorial (4)
- css tutorials (64)
- css3 (1)
- CSS3 Info (1)
- database (1)
- design copyright (1)
- design gadget (5)
- design review (3)
- design showcase (3)
- Design Tutorial (7)
- disqus (1)
- download (21)
- downloads (44)
- Emire (1)
- environment (1)
- eyovurc (1)
- flash (3)
- flash tutorial (1)
- Font (7)
- font review (5)
- Fonts (14)
- FREE Clip Art (1)
- free design box (9)
- FREE Photos (29)
- free templates (1)
- Free Themes (1)
- freelance (1)
- FreeMarker template error (1)
- Gallery (1)
- google chrome (1)
- graphic design (17)
- graphics (36)
- Hamasaki (1)
- HOT DEALS (1)
- how to (16)
- html (3)
- html tutorials (8)
- Humor (3)
- Icon (72)
- Icons (8)
- ie8 (3)
- Illustration (1)
- Illustrator (150)
- illustrator tutorial (2)
- Images (4)
- inspiration (19)
- Internet Tips (1)
- java script tutorial (1)
- jQuery (5)
- Miscs (4)
- money online (12)
- Orther (8)
- Photo A Day (1)
- Photo Work (3)
- photography (6)
- Photoshop (69)
- photoshop action (7)
- photoshop brushes (62)
- Photoshop Patterns (9)
- photoshop tutorial (14)
- Photoshop Tutorials (6)
- php tutorials (6)
- pl/sql tutorial (1)
- Popular Site (3)
- post reach (1)
- PowerPoint (2)
- resources (9)
- Simple (1)
- Spring Webflow (1)
- sql tutorial (1)
- Struts 1 vs Struts 2 (1)
- Struts 2 - AJAX (2)
- Struts 2 Example (4)
- Struts 2.0.14 (1)
- Struts 2.1.8 (1)
- Struts Errors (1)
- Struts Framework Comparison (1)
- templates (1)
- Templete (4)
- text effect (6)
- Texture (2)
- Tool Website (2)
- tools (6)
- tutorials (1)
- typography (4)
- Vector (13)
- viral linking (1)
- viral tagging (1)
- W3C CSS3 (26)
- Wallpaper (9)
- web design (51)
- web tool (6)
- Webdesign (7)
- WordPress (5)
- WordPress Theme (3)
- xml (3)


